Monday, October 24, 2011

7 Months after My Procedure/ Lower hair line and build out temples

I AM NOW AT 7 MONTHS POST-OP I FEEL LIKE I HAVE A WHOLE LOTTA HAIR! THANK YOU MAGIC MAN DR. BRETT BOLTON!

6 Months after the Procedure
Day of the Procedure
10 Months after the Procedure


Day of the Procedure

10 Months After the Procedure
Day of the Procedure
10 Months after the Procedure
10 Months After with my hair dry


To lower a hair line and build out the temporal peaks takes tremendous skill and talent. Many doctors have crashed their patients on the rocks trying to achieve this goal and have caused their patients difficulties and embarrassment.

The result above is a great measure of a doctor as an artist. Most doctors cannot do this. The hair line and temporal peaks have to be done perfectly for it to look natural. One hair out of place or at the wrong angle and you will see it from a mile away.
I have reached the point where I do not have major hair loss. I am basically very happy with my previous results and now I am looking to take my results to another level. Should I be happy with what I have? Or should I enjoy what a lot of people wish they could have at 50 years of age? A strong hair line with no apparent recession. After seeing Dr. Bolton do this for many of his patients, I decided I would take advantage of working for one of the most talented and gifted hair surgeons in the world. Why not? In six short months, I feel as if I have an incredible result. I have six more months of growth and improvement to come. There is a tremendous benefit when lowering the hair line and filling in the temporal peaks. You get the shaping and framing of your face which tends to make you look younger and better looking. It is not uncommon for people to say they look 10 years younger after this procedure grows out.
My thanks to Dr. Bolton who made an impact on my appearance in a positive way. I am most grateful and this is something I enjoy everyday when I get out of the shower and comb my hair.

Tuesday, October 18, 2011

My Unbelievable 5 Month Results From Dr. Brett Bolton

Above: Before picture taken on 4/13/11.
Above: Five months after the procedure on 9/13/11.


Above: Before picture taken on 4/13/2011.
Above: Five months after the procedure on 9/13/11.

Above: Before picture taken on 4/13/11.

Above: Five months after the procedure on 9/13/11

Above: Before picture taken on 4/13/2011.

Above: Five months after the procedure on 9/13/11. Dr. Bolton told me the results will continue to improve for at least 7 more months.

Wednesday, October 12, 2011

One Procedure Post- Op 9 Months

Before hair restoration on 4/19/10.

After hair restoration on 1/19/11.
Before hair restoration on 4/19/11.

After hair restoration on 1/19/11.
Before hair restoration on 4/19/10.


After hair restoration on 1/19/11.
Before hair restoration on 4/19/11.
After hair restoration on 1/14/11
Before hair restoration on 4/14/11.
After hair restoration on 1/14/11


Dr. Bolton has a strategy where he wants to maximize his patients results. Sounds obvious, but unfortunately, most doctors are not giving you the most hair possible and they are giving you primarily one and two hair grafts. Both those choices do not help a patient get a maximum result. This is a fantastic result for just one procedure. This is a unique approach that Dr. Bolton uses and thus you will not see others achieving this result.

In this case, Dr. Bolton starts in the frontal hair line. Dr. Bolton will strengthen the hair line and fill in the recessed areas on the left and right of the mid point of the frontal hair line. Dr. Bolton will also supplement the mid point where it is thinning to give the patient more density and take into account future hair loss to that area. Then Dr. Bolton will continue back into the mid scalp area. Dr. Bolton achieved excellent results for this patient in the frontal hair line and into the mid scalp area. Dr. Bolton only had a small amount of hair that he was able to put into the crown and moderately improve that area. It is quite an accomplishment to be able to substantially improve two areas of the scalp and moderately improve the crown because you are limited by how many hairs you can move in one procedure. The patient can always repeat the procedure and get enough hairs the second time to concentrate on the crown (back) area and have enough left over to go over the frontal and mid scalp again. This will enable to patient to take his results to an even higher level of results.

Friday, October 7, 2011

The Process of Hair Restoration from the Day of The Procedure Through the First Ten Months

     Day of Surgery Photos (March 29, 2011) Meeting With 
Dr. Bolton to go over Strategy Portrait 


Profile Facing Right 3/29/11
Top Down 3/29/11
Crown 3/29/11

DOCTOR BOLTON MAPS OUT THE AREA TO BE TRANSPLANTED AND SHAVES THE DONOR AREA FOR HARVESTING 3/29/11
Patient decided to shave his hair on the top to make the placing of grafts a bit easier for the staff.
This is done sometimes when the patient is not afraid to wear his hair very low or shaved.
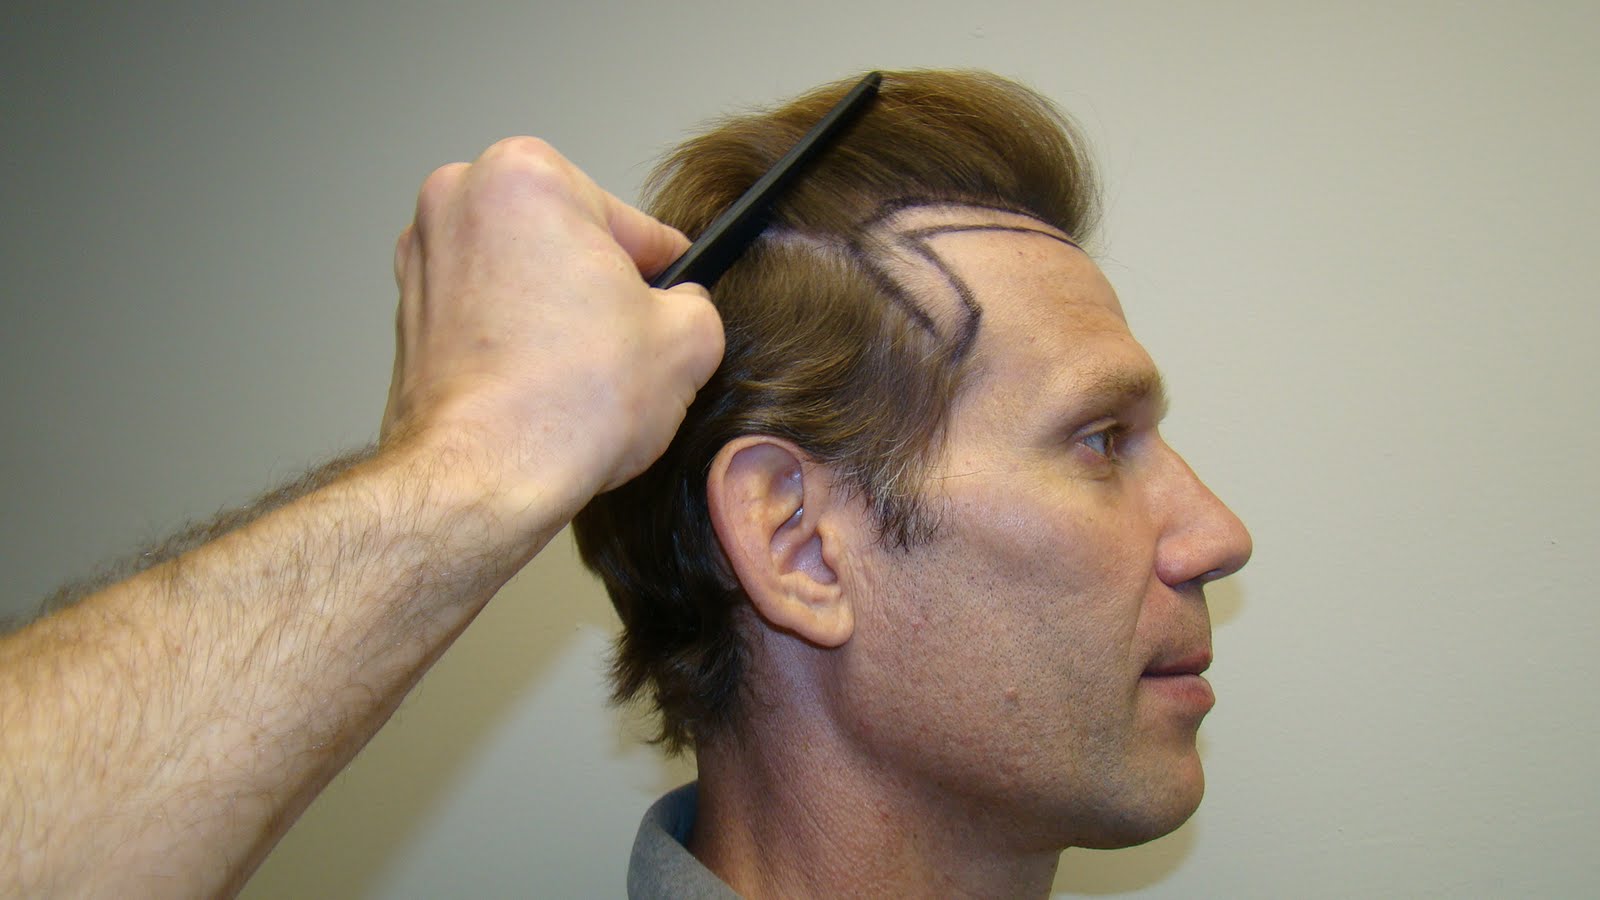
Side Profile Facing Left: The black crayon lines are a method whereby Dr. Bolton shows the patient prior to surgery the area to be filled. It is not a design, but an agreement between the doctor and patient as to where the grafts will be placed.
3/29/11
Profile Facing Right 3/29/11 Please note the donor area that is shaved extends significantly past the right and left ear to maximize the amount of hair taken. Many doctors stay between the ears thus limiting the amount of hair harvested.
Mapping out the Crown: Please note that the patient has lost hair in the frontal 1/3 area of his scalp and the back circular crown area of his scalp. He still has hair between those two areas in the mid-scalp area. Dr. Bolton makes the patient aware of the 3 FDA approved regimens for hair loss: Propecia, Rogaine and the laser light comb. Dr. Bolton will tell the patient to be prepared to repeat the procedure in the future as he continues to lose hair. The patient is fine with this and is committed to keeping his hair and use the FDA recommended therapies.

                                                                           3/29/11


                                              Portrait Immediately after Procedure 3/29/11

PORTRAIT SHOT: Dr. Bolton was able to harvest a 31 cm x 1 cm strip of tissue containing approximately 6,500 hairs. Please note that micro grafts(1hair grafts)are placed in the frontal hair line. Follicular units of 2 and three hairs are behind the frontal hair line. And then behind the follicular units, Dr. Bolton will combine follicular units into his multiple units grafts, thus achieving at least twice the density of the standard follicular unit procedure which averages typically two hairs per graft.

Side Profile Facing Left Immediately After Procedure. Please note that you can barely see the suture line below the wet hair.
                                                                          3/29/11

Side Profile facing Right

                                 Please note you can barely see the sutures under the wet hair.
                                                                          3/29/11
                                                           Procedure Complete 3/29/11

Crown 3/29/11 When Dr. Bolton places the recipient sites into the crown, he will mimic the way the hair originally grew. Hair in the crown, has a unique swirl to its design. You have to recreate this pattern in order to give the patient a natural result.

                                                Portrait (Day three Post-Op) April 2, 2011

                                              Top Down (Day three Post-Op) April 2, 2011

Crown (Day 3 Post-op, April 2, 2011) Please note that the sutures are hidden under the patient's hair.

                             The hair is lifted to show the sutures 3 Days Post-Op: APRIL 2, 2011
Please double click this picture you will be blown away by the width of a paper's edge suture line!

5 Days Post - OP (April 4, 2011) Patient has decided to cut his hair short to make the sides more consistent with the top.

                                                      5 Days Post Op (April 4, 2011)

                                                        5 Days Post-Op (April 4, 2011)

                                                    Portrait 6 Days Post-Op APRIL 5, 2011

                                                  Top Down 6 Days Post-Op: APRIL 5, 2011

                                    Side Profile Facing Right Six Days Post-Op: APRIL 5, 2011

                                     Side Profile Facing Left 6 Days Post-Op: APRIL 5, 2011

                             Crown Facing from the back 6 Days Post-Op: APRIL 5, 2011

                                              Portrait 10 Days Post-Op: APRIL 9, 2011


                                               Portrait Shot: April 9, 2011 10 Days Post Op

                                                 Top Down 10 Days Post Op: APRIL 9, 2011

                                               10 days Post- Op Crown: APRIL 9, 2011

                                      Sutures are Removed on Day 10 Post-Op: APRIL 9, 2011

There is No Detectability of a Donor Scar 3 Months Post-OP: JUNE 28, 2011: THE BARBER CUT THE PATIENT'S HAIR DOWN TO A 2 BLADE.


                        Progress Of Procedure From The Day of Surgery Through The First 6 Months

                                                    DAY OF SURGERY MARCH 29, 2011


                                                 MONTH TWO MAY 28, 2011


                                                MONTH THREE JUNE 28, 2011


                                                  MONTH FOUR JULY 28, 2011


                                                      MONTH FIVE AUGUST 28, 2011


                                                 MONTH SIX SEPTEMBER 28, 2011

                                                MONTH SEVEN OCTOBER 28, 2011

                                                MONTH EIGHT DECEMBER 22, 2011

                                                 MONTH NINE JANUARY 28, 2012

MONTH TEN FEBRUARY 28, 20012

MONTH ELEVEN MARCH 28, 2012


Progress of Growth of the Crown Area from Day of Surgery Through the First 10 Months

                                                   DAY OF SURGERY APRIL 28, 2011


                                              THREE MONTHS POST-OP June 28, 2011


                                              FOUR MONTHS POST-OP July 28, 2011


                                              FIVE MONTHS POST-OP August 28, 2011


                                             SIX MONTHS POST-OP September 28, 2011


                                               SEVEN MONTHS POST-OP November 28, 2011


                                       EIGHT MONTHS POST-OP November 28, 2011


                                              NINE MONTHS POST-OP DECEMBER 28, 2012

                                         
                                                TEN MONTHS POST-OP February 28, 2012
ELEVEN MONTHS POST-OP MARCH 28, 2012


What you see here is a patient who is willing to chart his progress every month. You can click on the photos to see his progress. At three months, you can see a definite change from where he started. You see improvement in the frontal hair line, especially, in the corners where previously there was no hair. You can see the crown is starting to fill in, too. The suture line is absolutely undetectable, even though, in some pictures he is wearing his hair with a 2 blade or about 1/4 to 1/2 inch in length. The patient has the majority of growth still to occur and his results will be a home run. We are very excited for our patient as he restores his youthfulness and good looks. At 6 months the patient can expect to improve significantly in the next 6 months. We will keep you posted.